 乐维官网
乐维官网
zabbix实践探索:乐维监控踩过的坑与优化方向
5312zabbix的实践探索:从直接修改zabbix源代码到用户交互层面的改良。
View detailsSearch the whole station
本教程仅适用于编译部署zabbix7.0 beta1版本,部署环境为kylinV10。
kylinV10 sp2 x86_64: https://pan.baidu.com/s/1-pg76mcXLn8rWP22Adr1iA?pwd=lwjk 提取码: lwjk
nginx: https://nginx.org/download/nginx-1.24.0.tar.gz
php: https://www.php.net/distributions/php-8.3.3.tar.gz
pg:https://ftp.postgresql.org/pub/source/v16.2/postgresql-16.2.tar.gz
timescaledb:https://codeload.github.com/timescale/timescaledb/tar.gz/refs/tags/2.13.1
zabbix:https://cdn.zabbix.com/zabbix/sources/development/7.0/zabbix-7.0.0beta1.tar.gz
linux+nginx+postgresql+php
(1) 本操作示例中linux环境使用kylinV10 SP2

(2) 环境已配置公网yum源

选择nginx版本 1.24.0
(1) yum 安装工具及环境依赖
# 编译工具安装
yum -y install gcc-c++
# nginx 依赖安装
yum -y install pcre-devel openssl-devel
(2) itops用户创建# 程序用户itops创建
groupadd itops
useradd -g itops itops
echo Kylin_p@ssw0rd | passwd –stdin itops
(3) nginx编译操作tar xf nginx-1.24.0.tar.gz
cd nginx-1.24.0/
./configure –user=itops –group=itops –prefix=/opt/nginx –with-http_stub_status_module –with-http_ssl_module –with-http_gzip_static_module –with-pcre
make -j8 && make install
(4) nginx配置文件编写 mv /opt/nginx/conf/nginx.conf /opt/nginx/conf/nginx.bak
vi /opt/nginx/conf/nginx.conf
#i#输入
user itops itops;
worker_processes 1;
error_log logs/error.log crit;
error_log logs/error.log notice;
error_log logs/error.log info;
pid logs/nginx.pid;
events {
worker_connections 1024;
}
http {
include mime.types;
default_type application/octet-stream;
#access_log logs/access.log main;
sendfile on;
#tcp_nopush on;
#keepalive_timeout 0;
keepalive_timeout 65;
#gzip on;
server {
listen 80;
server_name localhost;
#charset koi8-r;
#access_log logs/host.access.log main;
location / {
root html;
index index.html index.htm index.php;
}
error_page 500 502 503 504 /50x.html;
location = /50x.html {
root html;
}
location ~ \.php$ {
fastcgi_pass 127.0.0.1:9000;
fastcgi_index index.php;
fastcgi_param SCRIPT_FILENAME $document_root$fastcgi_script_name;
include fastcgi_params;
}
}
}
# 测试nginx配置格式
chown itops: -R /opt/zabbix
/opt/nginx/sbin/nginx -t
(5) nginx服务文件编写vi /usr/lib/systemd/system/nginx.service
#i# 输入
[Unit]
Description=nginx
After=network.target
[Service]
Type=forking
ExecStart=/opt/nginx/sbin/nginx -c /opt/nginx/conf/nginx.conf
ExecReload=/opt/nginx/sbin/nginx -s reload
ExecStop=/opt/nginx/sbin/nginx -s quit
PrivateTmp=true
[Install]
WantedBy=multi-user.target
(6) nginx服务启动及自启systemctl enable nginx –now
(7) 页面访问测试

选择postgresql 版本16.2
选择timescaledb 版本2.13.1
(1) yum安装工具及环境依赖yum install -y unzip gcc gcc-c++ perl readline readline-devel openssl openssl-devel zlib zlib-devel ncurses-devel perl-ExtUtils-Embed python python-devel libxslt* python3-devel
(2) cmake 工具安装yum install cmake -y
# cmake版本需大于3.4版本,如yum方式安装cmake版本低,则需要用手动编译方式进行替换
cmake –version
(3) PG编译安装# 编译PG
tar xf postgresql-16.2.tar.gz
cd postgresql-16.2/
./configure –prefix=/opt/postgresql –with-pgport=5432 –with-segsize=16 –with-blocksize=32 –with-wal-blocksize=64 –with-libedit-preferred –with-perl –with-openssl –with-libxml –with-python –with-libxslt –enable-thread-safety –enable-nls=en_US.UTF-8 –without-icu
make -j8 && make install
# 初始化
mkdir /data
chown itops: /data
su – itops
/opt/postgresql/bin/initdb -D /data/postgresql -E utf8
# 启动
/opt/postgresql/bin/pg_ctl -D /data/postgresql/ start
# 设定全局变量
vim /etc/profile
#i # 尾行追加如下部分
PATH=/opt/postgresql/bin:/usr/bin:/usr/sbin:/bin:/sbin/bin
export PATH
PG_CONFIG=/opt/postgresql/bin/pg_config
export PG_CONFIG
PGDATA=/data/postgresql
export PGDATA
LD_LIBRARY_PATH=/opt/postgresql/lib:$LD_LIBRARY_PATH
export LD_LIBRARY_PATH
# 执行如下命令使变量生效
source /etc/profile
(4) TS时序库编译(可选)tar xf timescaledb-2.13.1.tar.gz
cd timescaledb-2.13.1/
echo y | ./bootstrap -DREGRESS_CHECKS=OFF
cd ./build && make
make install
# PG配置载入ts模块
echo “shared_preload_libraries = ‘timescaledb'” >> /data/postgresql/postgresql.conf
# 重启pg令模块生效
su – itops -c ‘pg_ctl restart’
(5) pg服务文件编写vi /usr/lib/systemd/system/postgresql.service
#i# 输入
[Unit]
Description=PostgreSQL database server
After=network.target
[Service]
Type=forking
User=itops
Group=itops
Environment=PGPORT=5432
Environment=PGDATA=/data/postgresql
OOMScoreAdjust=-1000
ExecStart=/opt/postgresql/bin/pg_ctl start -D ${PGDATA} -s -o “-p ${PGPORT}” -w -t 300
ExecStop=/opt/postgresql/bin/pg_ctl stop -D ${PGDATA} -s -m fast
ExecReload=/opt/postgresql/bin/pg_ctl reload -D ${PGDATA} -s
TimeoutSec=300
[Install]
WantedBy=multi-user.target
(6) pg服务启动及自启su – itops -c ‘pg_ctl stop’
systemctl enable postgresql –now
选择php版本 8.3.3
(1) yum 安装工具及环境依赖oniguruma、oniguruma-devel包(kylinV10) yum -y install libxml2-devel bzip2-devel libcurl-devel libpng-devel libjpeg-devel freetype-devel gmp-devel openldap-devel readline-devel libxslt-devel net-snmp-devel
cp -frp /usr/lib64/libldap* /usr/lib/
yum install oniguruma-*
# 编译安装php
tar xf php-8.3.3.tar.gz
cd php-8.3.3/
./configure –prefix=/opt/php –with-config-file-path=/opt/php/etc –with-pgsql=/opt/postgresql –with-pdo-pgsql=/opt/postgresql –enable-gd –enable-bcmath –with-jpeg –with-freetype –enable-ctype –enable-xml –enable-session –enable-sockets –enable-mbstring –with-gettext –with-ldap –with-openssl –without-pdo-sqlite –without-sqlite3 –enable-fpm
sed -i “s@-lcrypto@-lcrypto -llber@g” Makefile
make -j8 && make install
# 配置php相关参数
cp php.ini-production /opt/php/etc/php.ini
ln -s /opt/php/etc/php.ini /etc/php.ini
cp /opt/php/etc/php-fpm.conf.default /opt/php/etc/php-fpm.conf
cp /opt/php/etc/php-fpm.d/www.conf.default /opt/php/etc/php-fpm.d/www.conf
sed -i “s@user = nobody@user = itops@g” /opt/php/etc/php-fpm.d/www.conf
sed -i “s@group = nobody@group = itops@g” /opt/php/etc/php-fpm.d/www.conf
sed -i “s@pm.max_children = 5@pm.max_children = 30@g” /opt/php/etc/php-fpm.d/www.conf
sed -i “s@;pid = run/php-fpm.pid@pid = run/php-fpm.pid@g” /opt/php/etc/php-fpm.d/www.conf
sed -i “s@post_max_size = 8M@post_max_size = 16M@g” /opt/php/etc/php.ini
sed -i “s@max_execution_time = 30@max_execution_time = 300@g” /opt/php/etc/php.ini
sed -i “s@max_input_time = 60@max_input_time = 300@g” /opt/php/etc/php.ini
# 生成php-fpm启动文件
cp sapi/fpm/init.d.php-fpm /etc/init.d/php-fpm
chmod +x /etc/init.d/php-fpm
chown -R itops: /opt/php
systemctl enable php-fpm –now
选择zabbix版本 7.0.0beta1
(1) yum 安装编译工具及依赖yum -y install libssh2 libssh2-devel OpenIPMI-devel libevent-devel unixODBC unixODBC-devel java-1.8.0-openjdk-devel openssl-devel
(2) zabbix编译及配置参数定义 tar xf zabbix-7.0.0beta1.tar.gz
cd zabbix-7.0.0beta1
./configure –prefix=/opt/zabbix –enable-server –enable-agent –with-postgresql=/opt/postgresql/bin/pg_config –with-net-snmp –with-libcurl –with-libxml2 –with-unixodbc –with-openipmi –enable-ipv6 –enable-java –with-openssl –with-ssh2 –with-iconv –with-iconv-include –with-iconv-lib –with-libpcre –with-libevent –with-zlib –with-zlib-include –with-zlib-lib –with-libpthread –with-ldap
make -j8 && make installchown itops: -R /opt/zabbix
vi /opt/zabbix/etc/zabbix_server.conf
# 文件最后追加如下行
LogFile=/tmp/zabbix_server.log
DBHost=localhost
DBName=zabbix
DBUser=zabbix
DBPassword=ZABBIX
DBPort=5432
Timeout=4
LogSlowQueries=3000
User=itops
StatsAllowedIP=127.0.0.1
(3) zabbix库创建# 创建zabbix用户
su – itops -c ‘createuser –pwprompt zabbix’
# 输入用户密码
# 创建zabbix库
su – itops -c ‘createdb -O zabbix -E Unicode -T template0 zabbix’

(4) 数据库表结构导入# 进入编译包数据库路径下
cd zabbix-7.0.0beta1/database/postgresql/
# 导入表结构
cat schema.sql | /opt/postgresql/bin/psql -Uzabbix zabbix
cat images.sql | /opt/postgresql/bin/psql -Uzabbix zabbix
cat data.sql | /opt/postgresql/bin/psql -Uzabbix zabbix
/opt/postgresql/bin/psql -Uzabbix zabbix -c ‘CREATE EXTENSION IF NOT EXISTS timescaledb CASCADE’
# 关闭压缩,如果需要正常压缩,则跳过下方sed命令
sed -i ‘s#compression_status=1#compression_status=0#g’ timescaledb/schema.sql
cat timescaledb/schema.sql | /opt/postgresql/bin/psql -Uzabbix zabbix
# 抛出 TimescaleDB is configured successfully 即视为超表创建成功,其余提示信息可忽略

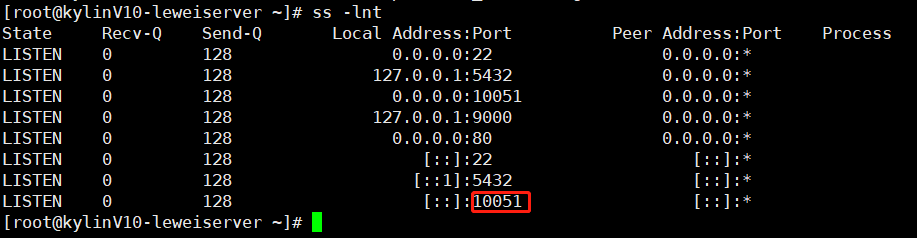
(1) 启动zabbix_server/opt/zabbix/sbin/zabbix_server
ss -lnt
(2) zabbix agent启动echo ‘User=itops’ >> /opt/zabbix/etc/zabbix_agentd.conf
/opt/zabbix/sbin/zabbix_agentd
(1) web部署# 进入编译包路径下
cd zabbix-7.0.0beta1/
# 拷贝ui代码至nginx
cp -r ui/ /opt/nginx/html/zabbix
chown itops: -R /opt/nginx/html/zabbix
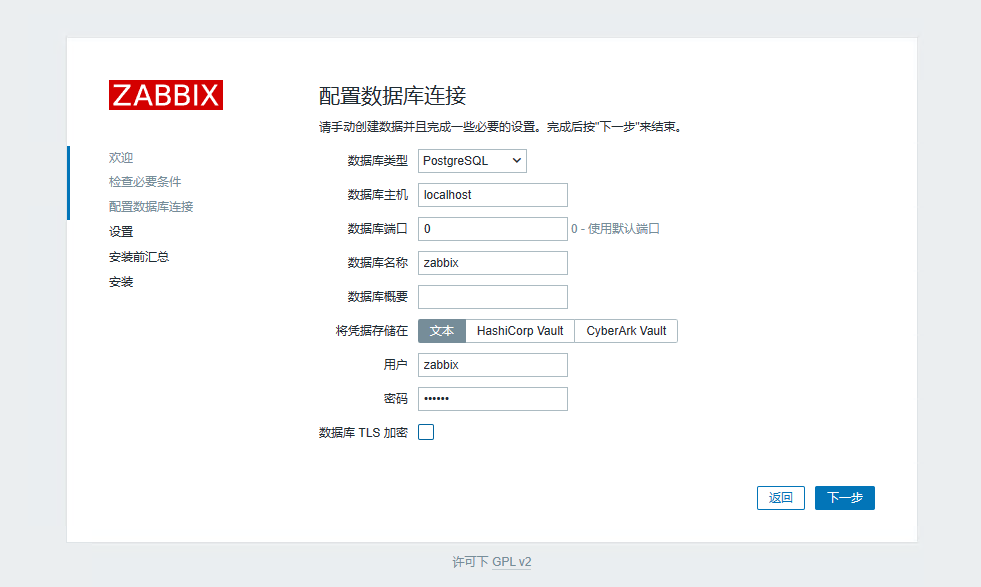
(2) web页面初始化配置


(3) 配置完成即部署完成。跳转登录页,默认账号密码为Admin/zabbix。


上就是zabbix7.0 beta1编译部署的全部内容,感兴趣的小伙伴不妨抢先上车体验。
此外,乐维监控V7.0版本也即将与大家见面,敬请期待。
大家好,我是乐乐,专注运维技术研究与分享,更多zabbix等技术知识与问题,欢迎到乐维社区交流~


zabbix日常命令有哪些?其中包括zabbix_server、zabbix_proxy、zabbix_get、zabbix_agentd、zabbix_agent2
View details